Fork me on GitHub

单机3实例搭建InnoDB Cluster环境

本文描述了如何通过单机三个msyql实例,创建一个Single-Primary Innodb cluster,并通过mysql Router对connections实现路由,实现高可用性。

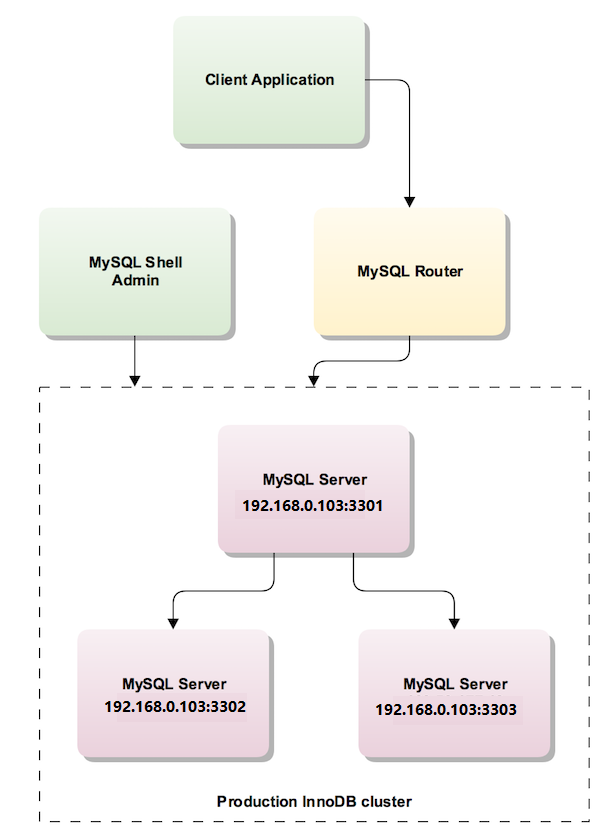
This section explains how to set up a single-primary InnoDB cluster and configure MySQL Router to achieve high availability.

This tutorial shows how to use MySQL Shell to create an InnoDB cluster consisting of a MySQL Server instance which provides the seed instance of the InnoDB cluster and holds the initial data set. Two more MySQL server instances are created and added to the InnoDB cluster. Then MySQL Router is deployed and used to route connections to the InnoDB cluster, and high availability is tested.

1. 安装3个mysql实例

注意:修改root密码时候设置SQL_LOG_BIN=0;

1
2
3
4
5
6
7
8
9
10
11
12
13
14
mysql> SET SQL_LOG_BIN=0;
Query OK, 0 rows affected (0.00 sec)
mysql> set password=password('admin_123');
Query OK, 0 rows affected, 1 warning (0.01 sec)
mysql> GRANT ALL PRIVILEGES ON *.* TO 'root'@'%' IDENTIFIED BY 'admin_123' WITH GRANT OPTION;
Query OK, 0 rows affected, 1 warning (0.01 sec)
mysql> flush privileges;
Query OK, 0 rows affected (0.01 sec)
mysql> SET SQL_LOG_BIN=1;
Query OK, 0 rows affected (0.00 sec)

2. Yum 安装MySQL Shell

1
2
3
wget https://dev.mysql.com/get/mysql57-community-release-el7-10.noarch.rpm
rpm -ivh mysql57-community-release-el7-10.noarch.rpm
yum install mysql-shell -y

3. Configuring the Instance

检查并配置3个数据库实例

1
2
3
mysql-js> \connect root@localhost:3301
mysql-js> dba.checkInstanceConfiguration('root@localhost:3301')
mysql-js> dba.configureLocalInstance('root@localhost:3301')

详细过程如下所示

1
2
3
4
5
6
7
8
9
10
11
12
13
14
15
16
17
18
19
20
21
22
23
24
25
26
27
28
29
30
31
32
33
34
35
36
37
38
39
40
41
42
43
44
45
46
47
48
49
50
51
52
53
54
55
56
57
58
59
60
61
62
63
64
65
66
67
68
69
70
71
72
73
74
75
76
77
78
79
80
81
82
83
84
85
86
87
88
89
90
91
92
93
94
95
96
97
98
99
100
101
102
103
104
105
106
107
108
109
110
111
112
113
114
115
116
117
118
119
120
121
122
123
124
125
126
127
mysql-js> dba.checkInstanceConfiguration('root@localhost:3301')
Please provide the password for 'root@localhost:3301':
Validating instance...
The instance 'localhost:3301' is not valid for Cluster usage.
The following issues were encountered:
- Some configuration options need to be fixed.
+----------------------------------+---------------+----------------+--------------------------------------------------+
| Variable | Current Value | Required Value | Note |
+----------------------------------+---------------+----------------+--------------------------------------------------+
| binlog_checksum | CRC32 | NONE | Update the server variable or restart the server |
| enforce_gtid_consistency | OFF | ON | Restart the server |
| gtid_mode | OFF | ON | Restart the server |
| log_slave_updates | 0 | ON | Restart the server |
| master_info_repository | FILE | TABLE | Restart the server |
| relay_log_info_repository | FILE | TABLE | Restart the server |
| transaction_write_set_extraction | OFF | XXHASH64 | Restart the server |
+----------------------------------+---------------+----------------+--------------------------------------------------+
Please fix these issues , restart the serverand try again.
{
"config_errors": [
{
"action": "server_update",
"current": "CRC32",
"option": "binlog_checksum",
"required": "NONE"
},
{
"action": "restart",
"current": "OFF",
"option": "enforce_gtid_consistency",
"required": "ON"
},
{
"action": "restart",
"current": "OFF",
"option": "gtid_mode",
"required": "ON"
},
{
"action": "restart",
"current": "0",
"option": "log_slave_updates",
"required": "ON"
},
{
"action": "restart",
"current": "FILE",
"option": "master_info_repository",
"required": "TABLE"
},
{
"action": "restart",
"current": "FILE",
"option": "relay_log_info_repository",
"required": "TABLE"
},
{
"action": "restart",
"current": "OFF",
"option": "transaction_write_set_extraction",
"required": "XXHASH64"
}
],
"errors": [],
"restart_required": true,
"status": "error"
}
mysql-js> dba.configureLocalInstance('root@localhost:3301')
Please provide the password for 'root@localhost:3301':
Detecting the configuration file...
Default file not found at the standard locations.
Please specify the path to the MySQL configuration file: /usr/local/mysql/mysql_3301/etc/my.cnf
Validating instance...
The configuration has been updated but it is required to restart the server.
{
"config_errors": [
{
"action": "restart",
"current": "OFF",
"option": "enforce_gtid_consistency",
"required": "ON"
},
{
"action": "restart",
"current": "OFF",
"option": "gtid_mode",
"required": "ON"
},
{
"action": "restart",
"current": "0",
"option": "log_slave_updates",
"required": "ON"
},
{
"action": "restart",
"current": "FILE",
"option": "master_info_repository",
"required": "TABLE"
},
{
"action": "restart",
"current": "FILE",
"option": "relay_log_info_repository",
"required": "TABLE"
},
{
"action": "restart",
"current": "OFF",
"option": "transaction_write_set_extraction",
"required": "XXHASH64"
}
],
"errors": [],
"restart_required": true,
"status": "error"
}

重启3个数据库实例

1
2
3
shell> systemctl restart mysqld@3301
shell> systemctl restart mysqld@3302
shell> systemctl restart mysqld@3303

重新检查3个实例,确保结果ok

1
2
3
4
5
6
7
8
mysql-js> dba.checkInstanceConfiguration('root@localhost:3301')
Please provide the password for 'root@localhost:3301':
Validating instance...
The instance 'localhost:3301' is valid for Cluster usage
{
"status": "ok"
}

4. Creating the InnoDB Cluster

Connect MySQL Shell to the seed instance, in this case the one at port 3301:

1
2
3
mysql-js> \connect root@192.168.0.103:3301
或者
mysql-js> shell.connect('root@192.168.0.103:3301')

Use the createCluster() method to create the InnoDB cluster with the currently connected instance as the seed:

1
mysql-js> var cluster = dba.createCluster('testCluster')

5. Adding Instances to an InnoDB Cluster

配置/etc/hosts

1
127.0.0.1 mysql001

Obtaining the cluster Instance Variable

1
2
mysql-js> \connect root@192.168.0.103:3301
mysql-js> var cluster = dba.getCluster("testCluster")

Add the second instance to the InnoDB cluster:

1
mysql-js> cluster.addInstance('root@192.168.0.103:3302')

Add the third instance:

1
mysql-js> cluster.addInstance('root@192.168.0.103:3303')

查看cluster 状态

1
2
3
4
5
6
7
8
9
10
11
12
13
14
15
16
17
18
19
20
21
22
23
24
25
26
27
28
29
30
31
32
33
mysql-js> cluster.status()
{
"clusterName": "devCluster",
"defaultReplicaSet": {
"name": "default",
"primary": "192.168.0.103:3301",
"status": "OK",
"statusText": "Cluster is ONLINE and can tolerate up to ONE failure.",
"topology": {
"192.168.0.103:3301": {
"address": "192.168.0.103:3301",
"mode": "R/W",
"readReplicas": {},
"role": "HA",
"status": "ONLINE"
},
"192.168.0.103:3302": {
"address": "192.168.0.103:3302",
"mode": "R/O",
"readReplicas": {},
"role": "HA",
"status": "ONLINE"
},
"192.168.0.103:3303": {
"address": "192.168.0.103:3303",
"mode": "R/O",
"readReplicas": {},
"role": "HA",
"status": "ONLINE"
}
}
}
}

6. 持久化配置文件

已经在cluster中的实例,第二次运行dba.configureLocalInstance(‘root@localhost:3301’),会将配置cluster的配置持久化到my.cnf

必须使用localhost连接后在每个实例单独执行

1
2
3
4
5
6
mysql-js> \connect root@localhost:3301
mysql-js> dba.configureLocalInstance('root@localhost:3301')
mysql-js> \connect root@localhost:3302
mysql-js> dba.configureLocalInstance('root@localhost:3302')
mysql-js> \connect root@localhost:3303
mysql-js> dba.configureLocalInstance('root@localhost:3303')

7. 安装配置 MySQL Router

Yum安装

1
2
3
wget https://dev.mysql.com/get/mysql57-community-release-el7-10.noarch.rpm
rpm -ivh mysql57-community-release-el7-10.noarch.rpm
yum install mysql-router -y

bootstrap 生成配置文件

1
shell> mysqlrouter --bootstrap root@localhost:3301 --user=mysqlrouter

配置文件/etc/mysqlrouter/mysqlrouter.conf内容

1
2
3
4
5
6
7
8
9
10
11
12
13
14
15
16
17
18
19
20
21
22
23
24
25
26
27
28
29
30
31
32
33
34
35
36
37
38
39
40
41
42
43
44
45
shell > cat /etc/mysqlrouter/mysqlrouter.conf
# File automatically generated during MySQL Router bootstrap
[DEFAULT]
name=system
user=mysqlrouter
keyring_path=/var/lib/mysqlrouter/keyring
master_key_path=/etc/mysqlrouter/mysqlrouter.key
[logger]
level = INFO
[metadata_cache:devCluster]
router_id=1
bootstrap_server_addresses=mysql://192.168.0.103:3301,mysql://192.168.0.103:3302,mysql://192.168.0.103:3303
user=mysql_router1_m55oiq8bjdry
metadata_cluster=devCluster
ttl=300
[routing:devCluster_default_rw]
bind_address=0.0.0.0
bind_port=6446
destinations=metadata-cache://devCluster/default?role=PRIMARY
mode=read-write
protocol=classic
[routing:devCluster_default_ro]
bind_address=0.0.0.0
bind_port=6447
destinations=metadata-cache://devCluster/default?role=SECONDARY
mode=read-only
protocol=classic
[routing:devCluster_default_x_rw]
bind_address=0.0.0.0
bind_port=64460
destinations=metadata-cache://devCluster/default?role=PRIMARY
mode=read-write
protocol=x
[routing:devCluster_default_x_ro]
bind_address=0.0.0.0
bind_port=64470
destinations=metadata-cache://devCluster/default?role=SECONDARY
mode=read-only
protocol=x

启动mysqlrouter(记得修改下权限 默认权限不对)

1
2
chown mysqlrouter.mysqlrouter /var/lib/mysqlrouter
systemctl start mysqlrouter

测试连接

1
2
3
4
5
6
7
8
9
10
shell> mysqlsh --uri root@localhost:6446
mysql-js> \sql
Switching to SQL mode... Commands end with ;
mysql-sql> select @@port;
+--------+
| @@port |
+--------+
| 3301 |
+--------+
1 row in set (0.00 sec)

8. Testing Failover

killing the PRIMARY instance 3301

1
systemctl stop mysqld@3301

测试连接(第一次失败,第二次成功)

1
2
3
4
5
6
7
8
9
10
11
12
13
14
mysql-js> \sql
Switching to SQL mode... Commands end with ;
mysql-sql> SELECT @@port;
ERROR: 2013 (HY000): Lost connection to MySQL server during query
The global session got disconnected.
Attempting to reconnect to 'root@localhost:6446'...
The global session was successfully reconnected.
mysql-sql> select @@port;
+--------+
| @@port |
+--------+
| 3302 |
+--------+
1 row in set (0.00 sec)

查看cluster状态, 可以发现3302实例已经变成Primary

1
2
3
4
5
6
7
8
9
10
11
12
13
14
15
16
17
18
19
20
21
22
23
24
25
26
27
28
29
30
31
32
33
mysql-js> cluster.status()
{
"clusterName": "devCluster",
"defaultReplicaSet": {
"name": "default",
"primary": "192.168.0.103:3302",
"status": "OK_NO_TOLERANCE",
"statusText": "Cluster is NOT tolerant to any failures. 1 member is not active",
"topology": {
"192.168.0.103:3301": {
"address": "192.168.0.103:3301",
"mode": "R/O",
"readReplicas": {},
"role": "HA",
"status": "(MISSING)"
},
"192.168.0.103:3302": {
"address": "192.168.0.103:3302",
"mode": "R/W",
"readReplicas": {},
"role": "HA",
"status": "ONLINE"
},
"192.168.0.103:3303": {
"address": "192.168.0.103:3303",
"mode": "R/O",
"readReplicas": {},
"role": "HA",
"status": "ONLINE"
}
}
}
}

bring the instance that you killed back online.

1
2
3
systemctl start mysqld@3301
mysql-js> cluster.rejoinInstance('root@192.168.0.103:3301')
mysql-js> cluster.status()

重新查看cluster状态

1
2
3
4
5
6
7
8
9
10
11
12
13
14
15
16
17
18
19
20
21
22
23
24
25
26
27
28
29
30
31
32
33
mysql-js> cluster.status()
{
"clusterName": "devCluster",
"defaultReplicaSet": {
"name": "default",
"primary": "192.168.0.103:3302",
"status": "OK",
"statusText": "Cluster is ONLINE and can tolerate up to ONE failure.",
"topology": {
"192.168.0.103:3301": {
"address": "192.168.0.103:3301",
"mode": "R/O",
"readReplicas": {},
"role": "HA",
"status": "ONLINE"
},
"192.168.0.103:3302": {
"address": "192.168.0.103:3302",
"mode": "R/W",
"readReplicas": {},
"role": "HA",
"status": "ONLINE"
},
"192.168.0.103:3303": {
"address": "192.168.0.103:3303",
"mode": "R/O",
"readReplicas": {},
"role": "HA",
"status": "ONLINE"
}
}
}
}

参考

Working with a Production Deployment

好记性不如烂笔头,生命不息,学习不止!

分享